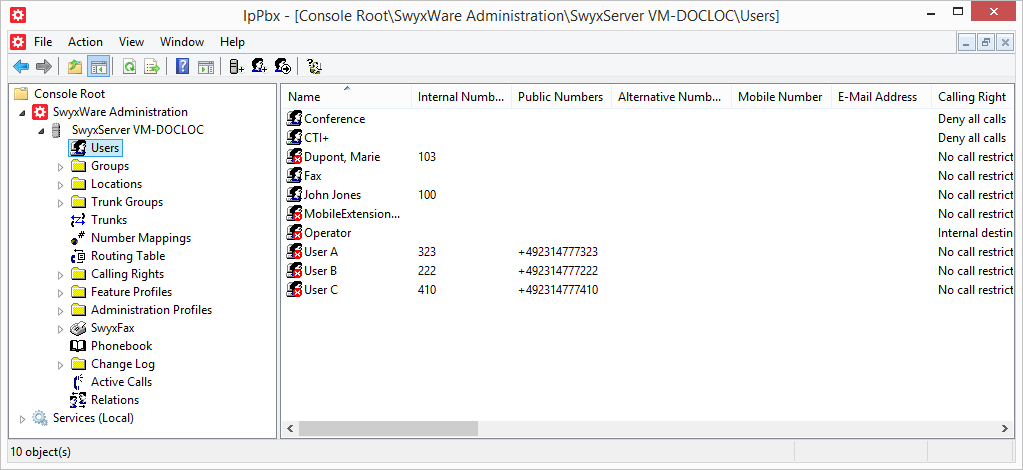
You can view the most important settings for all configured users in the tabular detail view of the user folder:
1 Click with the right mouse button on the "User" directory located in the window on the left.
2 Select "Add User…".
3 Name and type of new user:
Enter the name of the new user and, if applicable, a brief description.
Click on "Next>".
4 Location of the new user:
Select a location for the user from the dropdown list. The location determines site-specific parameters such as country and area code, prefixes, public line access prefix(es) and the time zone, see also
Locations.
Click on "Next >".
5 Internal numbers of the new user:
Enter the internal number for this user here.
| The numbers 110 and 112 are reserved for emergency calls in Germany. As of SwyxWare V13.30, these numbers are always interpreted as emergency calls, even if they are assigned to an internal user. |
Use "Verify" to immediately check whether this number has already been assigned.
Clicking on "Next unused" will automatically assign the next unused internal number to the user. You can also enter a number, e. g. 210, in order to leave the number range below untouched. Clicking on "Next unused" will then assign the next unused internal number. "Check" lets you check whether an entered internal number is already present.
Activate the checkbox "Show in Phonebook" if this number is to be listed in the Global Phonebook. Name resolution is always performed, regardless of whether the user is entered in the Global Phonebook.
Click on "Next>".
6 Internal number mapping:
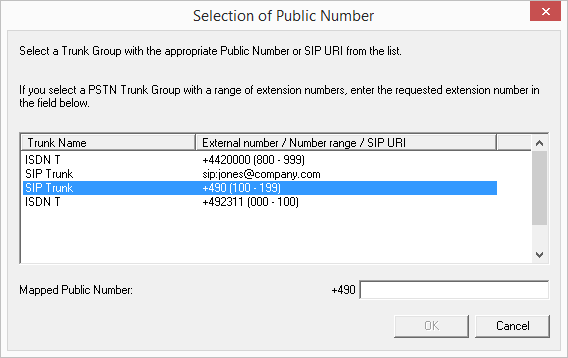
If the internal number is to be reachable from the public telephone network, it must be mapped to an external number. You can enter this public number directly in the field or click "Select...".
The "Choose public number" window will appear.
Select the SIP URI or public number here.
If the public number is to be taken from a numbers range, double-click on that range.
Assign the external number in the "Mapped Public Number:" field and click "OK".
| If the number entered is shorter than the numbers range of the trunk/s, a warning signal is generated. If the numbers range is defined as +441234777 000-999, a warning occurs, if you e. g. assign the number +44123477755 to a user. See External numbers. |
Click on "Next>".
7 Terminals:
Choose the terminals with which the user will log in to SwyxServer. This selection will determine which configuration dialogs must be completed. The entries relating to the terminal equipment will later be used to authenticate the user on the SwyxServer. You have several different options:

SwyxIt! and SwyxFax Client
Define the logon procedure. You can choose between the Windows user account, a user name or UPN and password or configure both: See
The "Authentication" Tab.
Windows User Account
Here, it is necessary that the computer of the SwyxIt! user and SwyxServer are within the same domain. For installations within one company, this is usually the case. You can enter the user account in the form "<Domain> \ <Account Name>". "Browse…" allows you to select a user from the domain.
Username and Password
When logging on SwyxServer the user enters his user name or UPN and password. He can save both in his local SwyxIt!.
SIP Devices
Enter the following user information. Specify whether the authentication mode is chosen according to the server standard settings, or whether authentication should always or never take place. If authentication is required, enter here the necessary data for authentication, such as the user name and the password. These do not need to be identical to the SwyxWare user name and password that you may have configured for logon with a SwyxIt!.
You can make special adaptations for SIP devices from another manufacturer after creating the user, in his Properties.
SwyxPhone Lxxx
Assign the user a PIN, with which he logs in to the SwyxServer. This PIN must contain between 1 and 16 digits.
Simple user for Call Routing
This user is not allowed to log in with a terminal.
Click on "Next>".
8 E-mail address:
The user must be assigned a unique e-mail address for SwyxWare integration in Microsoft Office (SwyxIt! function "Office Communication AddIn"). The e-mail address indicated must be the primary SMTP e-mail address set up for the user on the company's e-mail server (e.g. Microsoft Exchange Server).
This e-mail address is also the default setting for delivering voice messages. The e-mail address of the Voice Box can be configured by the user himself or in the SwyxWareadministration in the "Forwarding" dialog, see
Standard Voice Box Tab.
Additionally you can send the user via this address welcome emails with his registration data and configurations, see
Welcome E-mail.
| Configuring the special Voice Box email address has no influence on the existing email address created for MS Office integration. |
Click on "Next>".
9 Client authentication
A client's user must authenticate when logging on to SwyxServer. Basically, the following authentication types are available:
Authentication with Windows user account
Federated authentication via identity provider
Authentication with user name and password
Enable the "Continue without password" option if you want the user to set their password independently using the link in the welcome email or password reset email, see
Reset password:.
| If you set a password when you created the user, the welcome email for the user does not contain a password.
You will need to provide the user with the set password by other means. |
10 Call Permissions:
Call permissions and restrictions are grouped together in a profile.
Select a call permissions profile for the user from the selection list.
Click on "Next>".
11 Feature Profile:
The feature profile determines which functions are available to this user in principle.
12 Transfer properties to the new user:
You have the option of applying a configured user's properties to the new user you are creating. These properties include group memberships, relationships and call forwardings, and also most of the settings for SwyxIt! and the rules for the Call Routing Manager.
Select the option "Create new user account and apply the properties of an existing user", in order make use of this option. Then choose the user whose properties you would like to apply from the selection list. Alternatively, you can use the appropriate option to create an empty user account (with or without sample files for the Call Routing Manager) and manually configure the above-mentioned properties later.
Activate the "Open properties after finish" checkbox if the user properties shall be opened after the creation process.
Activate the "Send welcome E-mail" checkbox if you wish to send the user an E-mail with his registration data and configurations. You can also send the Welcome email after setting up the user at any time, e. g. due to configuration changes, see
Welcome E-mail.
| If you do not enable the "New users must change their password the first time they perform a login" option, the user will not receive a pre-configured password in their welcome email. |
13 Complete the set up of a new user by clicking on "Finish".
A new user is created. The "Waiting for user creation" dialog window will appear. Then, possibly the newly created user’s properties are displayed.
14 If you do not need the newly created user’s properties, click on "Cancel".
The user is created and appears in the user list.
| Create a dummy user, which is configured as you wish and provided with a deactivated account, to be used as a template. |