Requirements
Before configuration in Swyx Control Center the following requirements must be met:
Installation on SwyxServer
The function "MS Teams User Status" must have been activated during the SwyxServer installation. As a result the corresponding SwyxServer service "SwyxMsTeamsPresenceSync" will be installed.
https://help.swyx.com/cpe/latest.version/Administration/Swyx/en-US/index.html#context/help/run_setup_$
https://help.swyx.com/cpe/latest.version/Administration/Swyx/en-US/index.html#context/help/run_setup_$
|
|
The “MS Teams User Status” feature is not installed by default during the first installation or update.
|
|
|
If the service has not yet been installed, run the SwyxServer installation file again: In the first step, select the Modify option and in the next step, activate the MS Teams User Status function under Telephony. Then run the configuration wizard again.
|
Installation of the Solution AddOn (Only for SwyxON)
|
|
Note that this only applies if you have a SwyxWare version 12.xx installed.
|
|
|
If your SwyxWare system is installed in a SwyxON environment, an additional step has to be done via SwyxON Administration: Install the MS Teams Sync service as a Solution AddOn on your UC Tenant, see https://help.swyx.com/swyxon/1.00/Partner/Swyx/en-US/index.html#context/help/solution_addOn_$
|
Registration on your Microsoft Teams Tenant
On your Microsoft Teams Tenant in the Azure Active Directory you have to register the "SwyxMsTeamsPresenceSync" service:
|
|
The service runs under the account of a Microsoft Teams User. We recommend that you create a special user for this purpose.
|
To register the "SwyxMSTeamsPresenceSync" service in Azure AD
Name | Enter a name for the service registry. e.g.:SwyxMSTeamsPresenceSync |
Supported Account Types | Select the option "Accounts in this organizational directory only (YOURDOMAIN only - Single tenant)". |
Redirect URI | Select from the drop-down list Public client/native and enter "https://localhost/". |
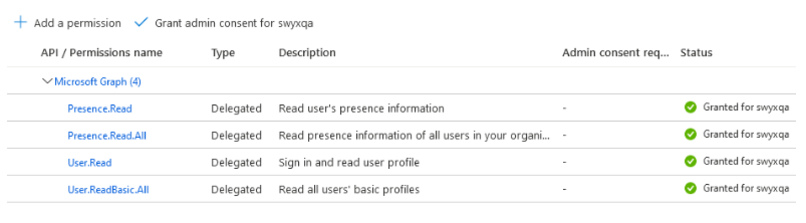
It is necessary that you grant an administrator consent for the permissions, see "Administrator Consent Button" at https://docs.microsoft.com/en-us/azure/active-directory/develop/quickstart-configure-app-access-web-apis#more-on-api-permissions-and-admin-consent |
Last modified date: 02/04/2022