SwyxIt! - Local Settings
All local settings are defined here, i.e. all information which only apply to the computer currently in use. A dialog field with several tabs is available for this:
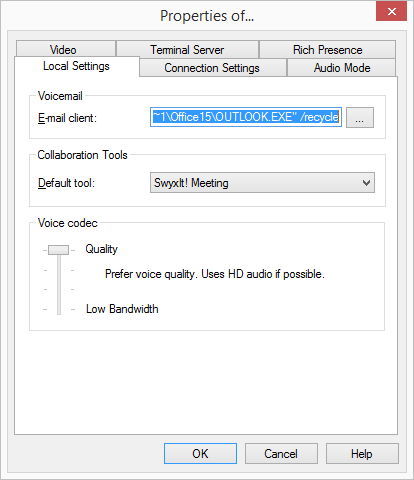
"Local Settings" tab

The e-mail application for calling your Voicemail
Selection of the Collaboration application you want to use as default
Setting for voice compression
"Rich Presence" Tab
Configuring when your status should be set to "Away".
Your status is automatically set to "Away" when you have been inactive for the minutes specified here.
Your status is automatically set to "Away" as soon as your screen saver becomes active.
Your status is automatically set to "Away" as soon as your computer is disabled.
Your status is automatically set to "Away" when you have an appointment according to your calendar.
You can have the subject of the appointment displayed as status text.
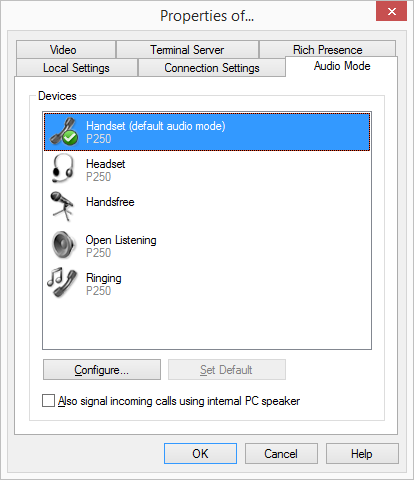
"Audio Mode" tab
Use this tab to configure the settings for the use of the audio devices:
Assign audio devices to the audio modes
Specify a speaker for the "Open listening" option
Specify a speaker for output of the ringing tone
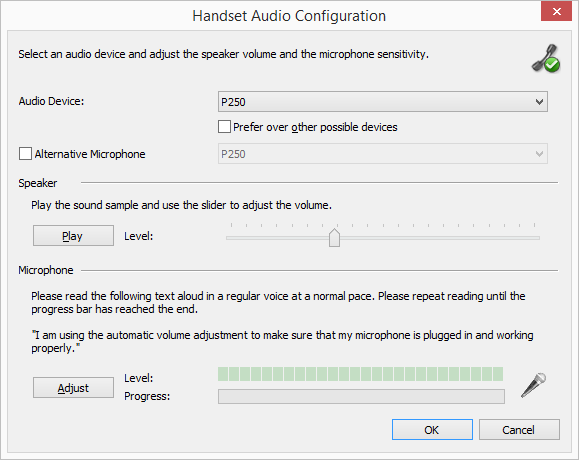
Set the volume and the microphone sensitivity for the audio modes
Set the volume for the "Open listening" option
Set the volume for output of the ringing tone
Specify additional signaling of the ringing tone via the PC housing speaker (e.g. if using a headset).
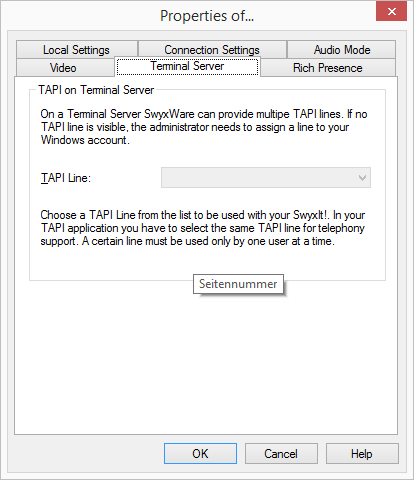
"Terminal Server" tab
You can specify settings here for use of a terminal server.
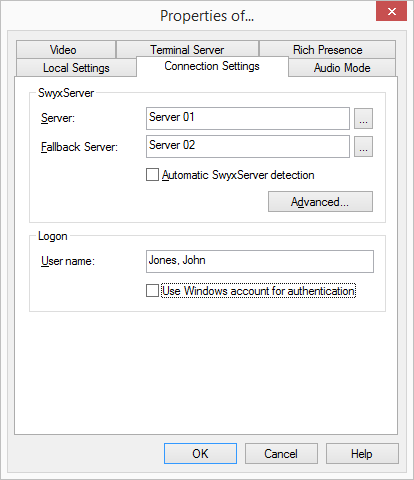
The "Connection Settings" tab
Computer name of SwyxServer or fallback server or automatic server recognition
Login with user name and password or Windows authentication
Connection settings for SwyxRemoteConnector
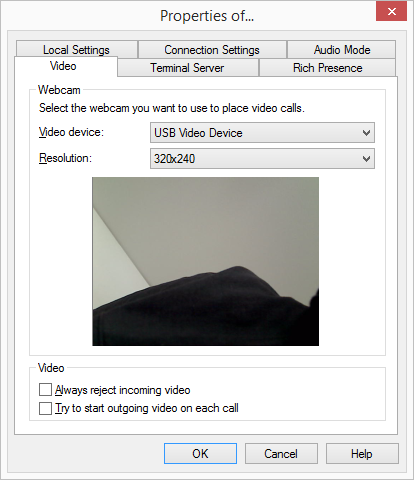
The "Video" Tab
This is where you specify the behavior of the video functionality.
| SwyxServer Does not save the parameters configured here under your user account, but rather on your PC. |
This is how you define the local settings for your SwyxIt! computer
1. Go to the menu bar and click on "Settings | Local Settings…".
The “Properties of…” page opens.
2. Select the “Local Settings” tab.
3. The e-mail application which is contacted when you use Voicemail is defined in the field “E-mail client”. This application is started when you click on the “Voicemail” button in order to listen to the Voice mails you have received. If any e-mail program is already installed at the time of the SwyxIt! installation, then the call for this program will be automatically entered here.
Or
click on 
, to browse the network environment.
5. In the "Voice Codec" area, you can use a slider to specify how the voice is compressed during transmission. The following options are available:

Highest voice quality
If possible, the voice data is transferred in HD audio quality. An attempt is made in this case to use Codecs in the order G.722/G.711a/G.711µ/G.729.
Prefer voice quality
Voice data is only compressed if necessary. An attempt is made in this case to use Codecs in the order G.729/G.711a/G.711µ.
Prefer low bandwidth
To spare bandwidth, the voice data is compressed. An attempt is made in this case to use Codecs in the order G.729/G.711a/G.711µ.
Use lowest bandwidth
In order to use the lowest bandwidth, the voice data is always compressed. The Codec G.729 is used.
This is how you determine the local settings for Extended Status Information
1. Go to the menu bar and click on "Settings | Local Settings…".
The “Properties of…” page opens.
2. Choose the "Extended Status Information" tab.
3. Specify in the "Status" area,
whether your status should automatically be set to "Away" when you have been inactive for the minutes entered here (default: 10 minutes),
and/or
whether your status should automatically be set to "Away" as soon as your screen saver becomes active,
and/or
whether your status should automatically be set to "Away" as soon as your computer is disabled,
and/or
whether your status should automatically be set to "Away" when you have an appointment according to your calendar,
and/or
whether the subject of your appointment should be displayed as status text.
| If you disable your computer during an active call, or the screen saver becomes active during it, then - even with this configuration - your status will not automatically be set to "Away". It remains as "Speaking". The same is true if you have been inactive for your preconfigured minutes during an active call, i.e. actuating neither the mouse nor the keyboard. |
This is how you configure the settings for the use of the audio devices
1. Go to the menu bar and click on "Settings | Local Settings…".
The “Properties of…” page opens.
2. Select the "Audio Mode" tab.
3. In the "Devices" area, click on the respective audio mode or option.
The line is highlighted.
4. Click on the "Configure.." button
The window "Audio Configuration" appears.
5. In the list box "Audio Device", choose an installed terminal device which is to be used in this audio mode. By selecting "deactivated", the audio mode will be turned off.
| To the "Ringing" option, assign the audio device you want to use for the call signal in case of incoming calls. For further information on audio modes and the "Open listening" option, see chapter Audio Modes. |
6. Activate the check box "Prefer to other audio devices", so that the selected device will be preferred to others, when the audio mode is assigned automatically.
| If you leave the box unchecked, the order of the audio devices will be set by SwyxIt! automatically. If a new device is installed, which supports the audio mode, it can automatically replace the existing configuration . |
7. If you want to use the microphone of another audio device, click the "Alternative microphone" checkbox and select the desired device from the list box.
| Setting of the microphone is not available in the options “open listening” and “Ringing”. |
8. To configure the volume of the sound or voice output for the audio mode, click on the "Play" button and move the slider until the required volume is set.
9. To configure the microphone sensitivity, click on the "Adjust" button and read out the text in quotation marks until the configuration process is completed (the progress indicator in the status bar is at the end).
10. Click on ”OK”.
11. When you switch on the option "Also signal incoming calls using internal PC speaker", a signal will also be produced over the PC speakers in addition to the telephone ring for incoming calls.
This is particularly helpful if you use a SwyxIt! Headset but you do not wear it all the time.
The audio configuration is saved.
12. If you want to set the highlighted audio mode ("Handset", "Headset", or "Handsfree") as default, click on the button "Set Default".
The audio mode is marked accordingly.
13. Click on ”OK”.
The settings in the "Audio Mode" menu are saved.
This is how you define the options for the Terminal Server
1. Go to the menu bar and click on "Settings | Local Settings…".
The “Properties of…” page opens.
2. Switch to the "Terminal Server" tab:
3. If SwyxIt! is operated on a terminal server, you can assign a TAPI line to this SwyxIt!.
4. Click on "OK".
This is how you specify the connection settings
1. Enter the name of the computer on which the SwyxServer is installed, in the “Server” field.
Or
click on 
, to browse the network environment
2. Enter a second SwyxServer in the field “Fallback Server” if the administrator has set up a Fallback SwyxServer in the network.
Or click on

to search in the network environment.
If the server is not operable, will then automatically log on to the Fallback Server.
3. In order that SwyxIt! automatically detects which SwyxServer the login should take place on, activate the option "Automatic SwyxServer detection". Depending on the configuration of your network, detection is made by DNS. Please consult your administrator about this.
Entry of a server and fallback server is not possible with automatic SwyxServer detection.
4. Use the “Advanced” button to see the connection settings dialog for SwyxRemoteConnector.
SwyxRemoteConnector Can be connected to SwyxServer, when you are outside your company network. Encryption is ensured via TLS (Transport Layer Security). Necessary certificates are managed and provided by your administrator.
| When connecting via SwyxRemoteConnector, SwyxPLUS, SwyxIt! Meeting, the SwyxIt! video function and SwyxIt! on a terminal server are not available in the current version. When using a VPN connection, however, above functions can be used in their full scope. |
5. Under "Logon", you can define, if you want to logon to SwyxServer with your SwyxWare user name and/or your Windows user account.
Logon with Windows user account:
If you select the checkbox "Use Windows account for authentication“, starts to authenticate with your Windows user account.If several SwyxWare users are assigned to your user account, you are asked during the logon process, which user to select for logging on to SwyxServer.
Logon with SwyxWare user name:
In the field ”User Name”, enter the name of the user account on the SwyxServer, with which you would like to work. This account must be set up by the administrator. If you do not use Windows authentication (i.e. you have not selected the "Use Windows account for authentication" checkbox), you need a password for logging on.
6. Click on "OK".
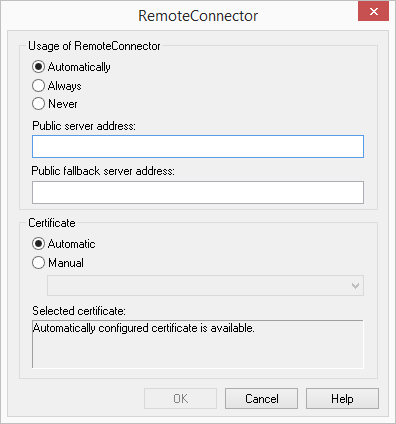
How to define connection settings for SwyxRemoteConnector
1. In order to connect to SwyxServer via SwyxRemoteConnector, select one of the three following options under “ Usage of RemoteConnector”:
Automatic
First, tries to establish a direct connection to SwyxServer. If the connection fails, e.g. because you are outside your company network, connects you to SwyxServer via SwyxRemoteConnector.
| This option is set by default. You can only change these settings, if your administrator has activated the selection of connection options for you. |
Always
Always connects you to SwyxServer via SwyxRemoteConnector.
If no connection via SwyxRemoteConnector is possible, does not attempt to establish a connection via your company network.
Never
Always establishes a direct connection to SwyxServer via your company network.
SwyxRemoteConnector is not used.
2. In the field “Public server address” enter the server server address and/or the server name according to the information provided by your administrator in connection with SwyxRemoteConnector.
3. Enter a second server in the field “Fallback Server” if the administrator has set up a Fallback SwyxServer in the network.
If the server is not operable, will then automatically log on to the Fallback Server.
| Depending on your administrator's configuration, the server addresses may already be entered. |
4. Under “Certificates”, you can chose between the following options:
Automatic
If your administrator has generated a certificate for the connection via SwyxRemoteConnector, is retrieving this certificate automatically from SwyxServer.
For this purpose, a connection to SwyxServer must be established.
| This option is set by default. Certificates are automatically imported irregardless of the connection option selected. If your administrator has generated a valid certificate for you, you can also use it, if the connection option “Never” has been selected beforehand. |
Manually
If you have selected this option, you can chose any certificate from the drop-down list, which is installed on your computer.
For more information on the installation of certificates, please contact your administrator.
| Connection options for SwyxRemoteConnector, server addresses, as well as import options for certificates could be preset by the administrator. |
| If you have any questions concerning certificates, please contact your administrator. |
This is how you define the options for the video functionality
Within the video configuration, a distinction is made between
Video data that you receive from your call partner (incoming video data).
and
Video data that you send to your call partner (outgoing video data)
1. Go to the menu bar and click on "Settings | Local Settings…".
The “Properties of…” page opens.
2. Move to the "Video" tab.
3. In the field "Video device", select the web camera with which you want to make video calls.
Your camera's transmission begins after a few seconds. You will see your own video image in the dialog window.
| The web camera must be connected to your computer, and you must have installed the drivers supplied with the web camera. The web camera must also be switched on. |
4. Select the resolution you want. The resolution varies from web camera to web camera. In brackets you will find the bandwidth that is needed for the selected resolution.
5. By activating the option "Always reject incoming video data", you specify that you never want to receive the video data that a call partner sends, and this will be rejected. Consequently, your call partner's video image will never be displayed.
However, if you always want to receive the video data sent by your call partner, then deactivate this option (default setting). Then whenever your call partner transmits video data, his video image is displayed in a separate window.
6. If you want your own video image to be transmitted automatically to your call partner on every call (whether incoming or outgoing), then activate the option "Try to start outgoing video on each call".
If you would rather decide for the individual call whether a video data transmission should occur, then deactivate this option (default setting).
You can then activate video data transmission spontaneously during an active call, with the help of the video button on the skin.
7. Click on “OK”.
| A video data transmission can only occur during an active call! |