The context menu for the Shortcut
If you click with the right mouse button on the Shortcut, the context menu will appear.
This is how you link a program or an Internet address to a Shortcut button
1. Click with the right mouse button on the Shortcut button.
The context menu will appear.
2. Click on "Properties".
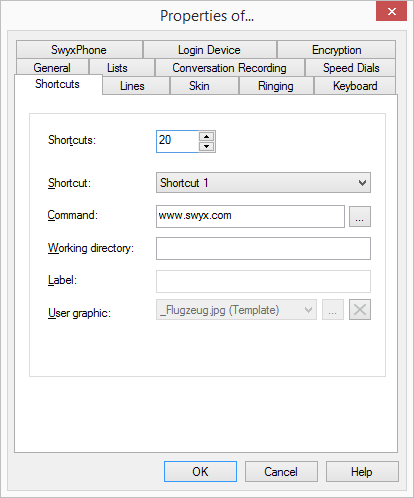
The "Properties of…" window will appear.
3. Enter the name and the path of the program to be run or the web page you want in the “Command” field.
Examples:

www.swyx.com
Outlook:
Public Folder/All Public Folders/Swyx Employees
C:\Programme\Microsoft Office\Office\winword.exe
Click on
to search for the appropriate files.
4. Then, in the field “Working directory”, you have the option of entering the path to the working directory you want.
Programs sometimes require files which are stored in another location. For this reason, you enter the path to the working directory here so that these file can be located.
5. Enter the text to be shown on the button in the “Label” field.
6. Enter the file name of a graphic into the “User bitmap” field. This image will be displayed on the Shortcut.
Here, for example, you can include the logo of a program or of a company.
Click on 
,to search for the appropriate files.
You can only select a graphic if the Skin you use allows a user-defined image.
You can use graphics in the following formats: BMP, GIF, JPEG, PNG and TIFF. These are automatically scaled as they are read in if they are too large for the area provided on the shortcut button.
7. Click on "OK".
You can export or import speed dials and shortcuts.
This is how you configure your Shortcuts
1. In the menu bar click on "Settings | User Profile" and select the "Shortcuts" tab.
2. In the first field, you define the maximum number of Shortcut buttons to be displayed.
3. Open the “Shortcut” drop-down list and select the Shortcut button to be configured.
4. Then enter all of the necessary parameters, such as the command line, the working directory and the label of the button.
| Only buttons, which have been defined according to the Skin definition (e.g. Buttons 1-5 and Button 7) will be shown on the Skin. |