help | 9 Voice Box and Remote Inquiry | Configuring the Standard Voice Box
9.3 Configuring the Standard Voice Box
In order to receive Voice messages you should first configure your Standard Voice Box. This is usually done directly after the installation of SwyxIt!, using the recording wizard. However, you can change the Standard Voice Box at any time in the Call Forwarding Configuration, see To configure your Standard Voice Box.
You can specify the following options:
*the welcome message that a caller hears
*the possibility of leaving a message at all
*the length of the recorded messages
*the e-mail address to which the voice message will be sent
*the use of Remote Inquiry
Remote Inquiry can be used, e.g. from another line, to check your voice messages or to change your call forwardings.
You can design more extensive call handling using the Call Routing Manager. See also help.enreach.com/cpe/13.28/CRM/Swyx/en-US/index.html#context/help/CRM_rules_$.
To configure your Standard Voice Box 
1 Click on Settings | Configure Call Forwardings in the menu bar.
or
1 Click with the right mouse button on the Voice Box button and click on Configure Voice Box.
or
1 Click on the Button Call Forwardings.
*In each case, the Properties of... window will appear.
2 Open the tab Standard Voice Box.
3 Activate the check box Welcome Announcement to define the welcome message.
During installation, the Recording Wizard already prompted you to record the welcome message for the Voice Box - you can change it here.
4 Define the announcement to be played.
You have several options:
*Select a file from the dropdown list.
*Browse your hard drive by clicking on .
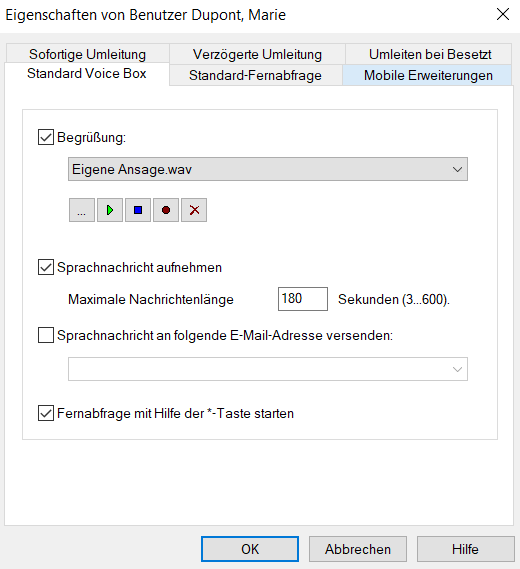
When searching, you can also choose a file in MP3 format. Upon selection, the MP3 file will automatically be converted into the supported WAV format and saved in your personal directory on the SwyxServer. The converted files are therefore available for use later. During the conversion process, the Info dialog "Please wait, the file is being converted into WAV format" will open.
*Click on , to listen to the selected file.
Click on to stop playing the file.
*To record a new announcement, click on : You will now be prompted to enter a file name. The Start Recording window appears. Click on Start to begin recording the announcement. Stop recording by clicking on .
*To delete the selected file, click on .
* 
The WAV files, which the administrator has made available to all users, have the extension “(Template)” in the file name. These templates cannot be deleted.
 
5 Activate the Record Voice Message check box if you want to offer callers the option to record voice messages.
6 Set the maximum recording time for a voice message under Maximum Voice Message Length to prevent the files in which the messages are stored from being too large.
* 
Please remember that it makes sense to limit the length of the message because, depending on the compression used, each recorded second of a voice message requires 2 to 16KB of memory space (therefore, an announcement which is 14 seconds long requires, e.g. 28 to 224 KB, and an announcement which is 1:21 minutes long requires up to 1.2 MB).
 
7 Activate the check box Send Voice Message to E-mail address and enter an e-mail address if received voice messages should also be delivered by e-mail.You can enter several E-mail addresses here. They must be separated by a semicolon.
*You will then find each recorded voice message in your e-mail client (e.g. Outlook) as an attachment to an e-mail.
8 Activate the check box "Start Remote Inquiry using the *-key to be able to listen to your voice messages from another line or to remotely change your Call Forwarding Unconditional.
Last modified date: 10.19.2023