7.1 Using the Phonebook
To call the Phonebook
1 You have several options:

Click on the "Phonebook" button or
click on “Lists | Phonebook...” in the menu bar.
The “Phonebook” window will appear.
To call a subscriber from the Phonebook
1 You have several options:
Click on die Taste the "Phonebook" button or
click on “Lists | Phonebook...” in the menu bar or
click with the right mouse button on the SwyxIt! user interface and then on “Lists | Phonebook...”.
The “Phonebook” window will appear.
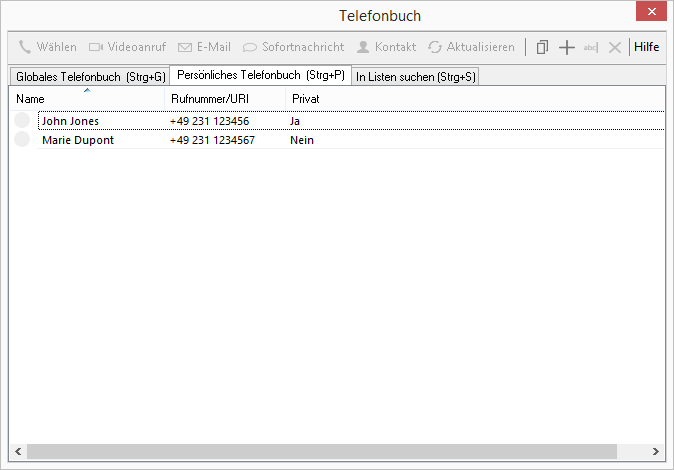
2 Click on the corresponding tab to select the phonebook to be used (global or personal). You see a list of the entries saved in the Phonebook and status for the respective subscriber, if available. You also have the option of finding a subscriber with the search function (
To search through the phonebooks and contacts).
If you have selected the Global Phonebook, you can use the "Refresh" button to update the status display for the current availability.
You can see in the Private Phonebook whether your entries are marked as "Private".
Private entries are only used by you for name resolution (e.g. in your lists or in case of an incoming call). For signaling of your calls to another subscriber, only the number is displayed.
| The status display is not available for all entries in the Global Phonebook. The status is only displayed for users who are logged on to the same SwyxServer, or to a SwyxServer that is linked by site coupling to your SwyxServer and has been appropriately configured for status signaling. |
3 In the list, click on the subscriber you would like to call.
4 Click on “Dial”.
The number will be dialed. Alternatively, simply double-click on an entry.
| All telephony functions that you start from the SwyxIt! skin (e.g. clicking on a handset button or line button) are using the default audio mode, see Audio-Modes. |
To search through the phonebooks and contacts
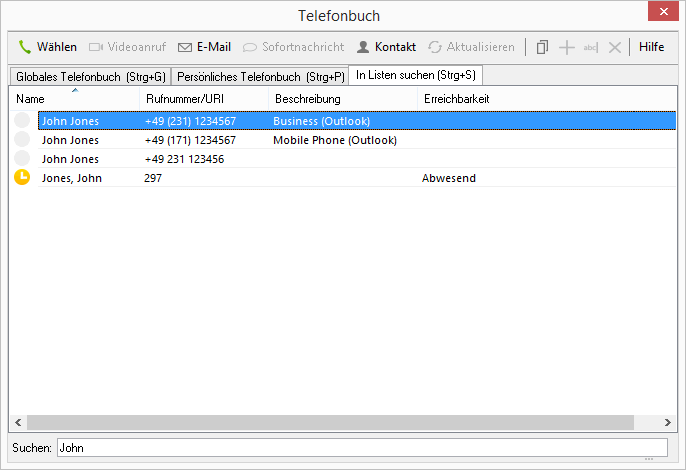
1 Open the phonebook and choose the tab "Search in Lists".
2 Enter in the "Search" field the name or a part of the name to be found.
SwyxIt! displays all entries from the global and personal phonebooks and from the contacts, which contain the search text. The more characters you enter, the more the search is restricted.
3 Click on the desired entry to mark it, and then click on the "Dial" button to start to dial. You can also dial the entry directly by double-clicking.
| You can also enter the search text directly in the input field on the SwyxIt! skin and confirm with the Enter key. If the text is not identified as a number, the search function is called directly. The results are displayed as a select list. |
| If a subscriber is logged on to the same SwyxServer as you, or to a linked SwyxServer with status signaling, you can also see the status from the search list. |
| When searching in contacts, the Outlook or SwyxIt! Lotus/IBM/HCL Notes plugin must be installed and the folders/databases to be searched must be configured accordingly. |
To add a subscriber to the Phonebook
1 You have several options:
Click on die Taste the "Phonebook" button or
click on “Lists | Phonebook...” in the menu bar or
click with the right mouse button on the SwyxIt! user interface and then on “Lists | Phonebook...”.
The “Phonebook” window will appear.
2 Select the Personal or Global Phonebook with the corresponding tab.
If you want to edit the Global Phonebook, you must have the appropriate permissions. Contact your administrator for further information.
3 Click on the “Add” button.

A window opens: “Add Entry".
4 Enter the name and number of the subscriber.
The name should not begin with a digit or the character #, in order to avoid misinterpretations by the system.
5 Activate the checkbox "Private" if applicable. This is only present in the Personal Phonebook.
Checkbox "Private" activated: The new entry is then only used on your side for name resolution (e.g. in your lists or in case of an incoming call). For signaling of your calls to another subscriber, only the number is displayed.
Checkbox "Private" deactivated: The new entry is then in general use for name resolution. The name is also used in call signaling to another subscriber.
| Wherever possible, store the numbers in the public network in your phonebook in the "canonical telephone number format" (e.g. +49 (89) 12345-67), or as a SIP URI for VoIP numbers (e.g. thomas.meier@firma.de). If you add a call number not in the canonical number format (e.g. without a country code), please do not forget the number for the public line access. |
6 Click on "Add".
The “Phonebook Entry” window will be closed.
7 Click on "Close".
The Phonebook will be closed.
To change an entry in the Phonebook
1 You have several options:
Click on die Taste the "Phonebook" button or
click on “Lists | Phonebook...” in the menu bar or
click with the right mouse button on the SwyxIt! user interface and then on “Lists | Phonebook...”.
The “Phonebook” window will appear.
2 Select the Personal or Global Phonebook with the corresponding tab.
If you want to edit the Global Phonebook, you must have the appropriate permissions. Contact your administrator for further information.
3 Click in this list on the entry you would like to change.
4 Click on "Modify”.

A window opens: "Modify Entry".
5 Enter your changes.
| Wherever possible, store the numbers in the public network in your phonebook in the "canonical telephone number format" (e.g. +49 (89) 12345-67), or as a SIP URI for VoIP numbers (e.g. thomas.meier@firma.de). |
6 Click on "Modify".
The “Phonebook Entry” window will be closed.
To delete an entry in the Personal Phonebook
1 You have several options:
Click on die Taste the "Phonebook" button or
click on “Lists | Phonebook...” in the menu bar or
click with the right mouse button on the SwyxIt! user interface and then on “Lists | Phonebook...”.
The “Phonebook” window will appear.
2 Select the Personal or Global Phonebook with the corresponding tab.
If you want to edit the Global Phonebook, you must have the appropriate permissions. Contact your administrator for further information.
3 In the list, click on the subscriber you would like to delete.
4 Click on "Delete”.

5 Click on "Yes" to confirm the deletion.
6 Click on "Close" to close the window.
Last modified date: 10.19.2023