You can assign contact data from a connected application (e.g. Swyx VisualContacts, Microsoft Outlook, Lotus/IBM/HCL Notes) to a speed dial button. The contact data on this speed dial button will be updated anytime you start the context menu or the contact card, seeThe context menu for Speed Dial buttons and Contact Card.
For further information on the configuration of applications, please refer to the respective chapters:
The contact name ("Label" field) and the standard number (“Number/URI” field) are not being considered during the retrieval (update of advanced contact information) and can only be manually changed by the user.
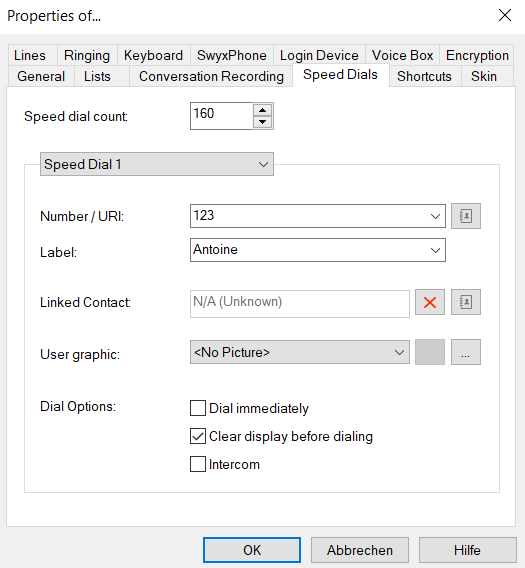
To define the properties of a Speed Dial
1 Click with the right mouse button on the Speed Dial button.
The context menu will appear.
2 Click on "Properties".
The "Properties of…" window will appear.
3 Enter the standard number into the “Number/URI“ field,, which can be selected by clicking on the speed dial button (valid numbers are numeric sequences or SIP-URIs)
or
click on next to the "Number/URI" field, in order to retrieve the SwyxIt! Phonebooks.
Select the desired contact in the global or personal phonebook and confirm your selection by pressing the Enter button.
The contact's number and name will be entered in the “Number/URI” and “Label” fields respectively.
4 Enter the text for the label of the Speed Dial in the “Label” field.
5 If you want to assign a linked contact to a speed dial button, click on next to the "Linked Contact" field.
The dialog window "Select Linked Contact" will open:
Select the desired application (data source) in the list box or leave the standard setting "(All Sources)".
Enter the search term into the "Search" field.
You can enter a sequence of letters to search names of people or companies.)
Click on the "Search" button.
The list of search results will appear.
The search results may contain the following information, displayed in the respective columns:
Name
- Company (Organization)
- Database
- Source (Application)
You can hide columns by right-clicking on the headline and deactivating the respective entry in the context menu.
Click on a line or use the arrow keys to scroll down the list.
The lower section contains an overview of the marked contact.
Double-click on the desired line.
The contact data will be entered in the respective dialog windows.
6 Enter the file name of a graphic into the “User Picture” field. This image will be displayed on the Speed Dial button.
Here, for example, you can include a small portrait of the subscriber. Click on to search for the appropriate files in the data system.
If "Automatic“ is selected, the image that the user has chosen for himself is automatically displayed on the Speed Dial. If he changes his user picture, the image on the Speed Dial also changes.
If you have selected "Automatic", SwyxIt! always automatically updates the image on the Speed Dial during the logon to the server. If a user changes his picture, you will not see the new picture until you log SwyxIt! on to the server once more.
When performing a re-installation, the option "Automatic" is set as default. When performing an update from an older version, the previous picture selection is preserved.
You can only select a graphic if the Skin you use allows a user-defined image.
You can use graphics in the following formats: BMP, GIF, JPEG, PNG and TIFF. These are automatically scaled as they are read in if they are too large for the area provided on the Speed Dial.
Your own user picture should preferably not exceed a size of 100x100 pixel. If a larger image is selected, SwyxIt! reduces it proportionately to this size. Available transparency information in the picture, however, might be lost.
7 Activate the option “Dial immediately” in order to dial the subscriber immediately by clicking on the Speed Dial. (activate the option)
If this option is deactivated, you can still change the phone number before the actual dialing procedure takes place.
8 Activate the option "Clear display before dialing", so that only this number is transferred. Existing inputs are removed.
If this option is deactivated, the assigned number will be added to the existing inputs. It is thus possible to attach a call-by-call code to the actual number of the subscriber by clicking on two Speed Dials sequentially.
9 If you activate the "Intercom" option, the number will be dialed immediately and the connection is established automatically, i.e. your conversation partner's phone will immediately pick up the call (Intercom Connection).
10 Click on "OK".
The speed dial button is assigned.
If you have assigned a linked contact to the speed dial button, the respective contact data will also be assigned to the context menu and the contact card of this speed dial button.
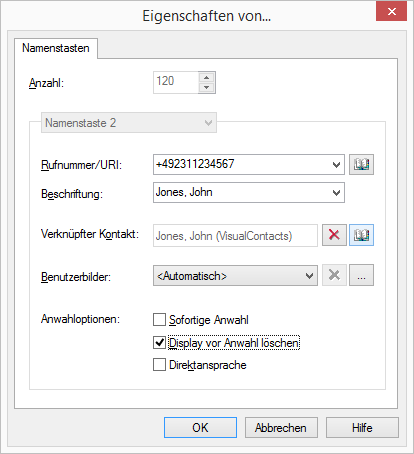
1 In the menu bar click on "Settings | User Profile" and select the "Speed Dials" tab.
2 In the first field, you define the maximum number of Speed Dials to be displayed.
3 Open the “Speed Dial” drop-down list and select the Speed Dial to be configured.
4 Enter the standard number into the “Number/URI” field, which can be selected by clicking on the speed dial button (valid numbers are numeric sequences or SIP-URIs)
or
click on next to the "Number/URI" field, in order to retrieve the SwyxIt! Phonebooks.
Select the desired contact in the global or personal phonebook and confirm your selection by pressing the Enter button.
The contact's number and name will be entered in the “Number/URI” and “Label” fields respectively.
5 Enter the text for the label of the Speed Dial in the “Label” field.
6 If you want to assign a linked contact to a speed dial button, click on next to the "Linked Contact" field.
The dialog window "Select Linked Contact" will open:
Select the desired application (data source) in the list box or leave the standard setting "(All Sources)".
Enter the search term into the "Search" field.
You can enter a sequence of letters to search names of people or companies.)
Click on the "Search" button.
The list of search results will appear.
The search results may contain the following information, displayed in the respective columns:
Name
- Company (Organization)
- Database
- Source (Application)
You can hide columns by right-clicking on the headline and deactivating the respective entry in the context menu.
Click on a line or use the arrow keys to scroll down the list.
The lower section of the window contains an overview on the marked contact.
Double-click on the desired line.
The contact data will be entered in the respective dialog windows.
7 Choose a picture (if the Skin allows this). You can choose from:
a standard picture from the SwyxWare database, with the additional marking "(Template)”.
the option "Automatic", which means that the user's own stored user picture will be displayed on the Speed Dial
"no picture", which means that a standard image with a gray portrait will be displayed
a picture from the file system.
8 Choose the dialing mode, and specify whether
You would like to dial the number immediately, i.e. the connection will be immediately established, when you click on the button.
the contents of the input field (or display) should be deleted before dialing. This means that only the number configured here will be shown in the display. No code or project code will precede the number.
you would like to use the number for an Intercom connection. In this case, the connection will be made immediately and you give the other subscriber your message directly, without him having to pick up the call.
 next to the "Number/URI" field, in order to retrieve the SwyxIt! Phonebooks.
 next to the "Linked Contact" field.