Each button can take on different states depending on its type. The button can be assigned an image (BMP file) or an animation (AVI file) for each of these states.
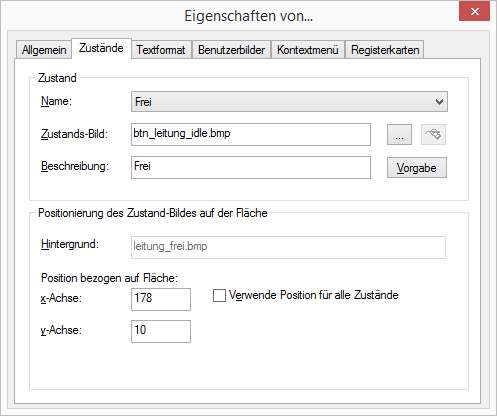
1 Open “State” and click on the “Name” drop-down list.
Here you will find a list of all the available states according to the type of the button.
The following states are available for a Line Button

“Idle”
“Dial”,
“Busy”
Some states may include placeholders. In this case, %peeraddress% represents the name of the caller and %calledaddress% represents the name of the subscriber called.
2 The graphic file or the AVI animation to be used for the button state is defined in the field “State Image”.
Click on

to search for the appropriate files or
Click on

to edit the selected graphic using the linked graphic application.
If no state image was specified for a particular state, the background image is displayed.
For formats that don't support transparency, the color of the upper left pixel of the graphic, or of the same pixel of the first graphic in the AVI animation, will be interpreted as a transparent color. This means that the button background graphic and/or the background graphic of the Skin will show through in all areas of the state image in which this color occurs.
3 Enter a short help text for the QuickInfo in the ”Description” field. This QuickInfo appears when you move the mouse pointer over the respective button.
4 Click on ”Default” in order to resume using the default text (standard) for the description.
5 The coordinates of the graphic or AVI file to be displayed within the button are defined under “Position of State Image on Object” in the “x-Axis” and “y-Axis” fields. The zero point of the coordinate system lies in the upper left corner of the button background graphic.
6 Enable the option ”Use position for all states” in order to use the position entered under ”x- and y-Axis” for all of the graphic or AVI files assigned to states.