You can assign any background images to SwyxIt!. You can use the following formats for this: BMP, GIF, JPEG or TIFF. The SwyxIt! window size is then equivalent to the size of the graphic used.
In addition, you can define a second background image. In this case, a distinction is made between the active and the inactive state of the SwyxIt!-window, which cannot be easily distinguished on sight when using a transparent Skin.
You define a blue background for the active state and a gray background for the inactive state. You now see a SwyxIt! window with a gray background on your PC. If you receive a call or if you activate the SwyxIt! interface yourself by clicking on it, the gray background will change to a blue one.
You are in Edit Mode for the Skin.
1 Click on the SwyxIt! user interface.
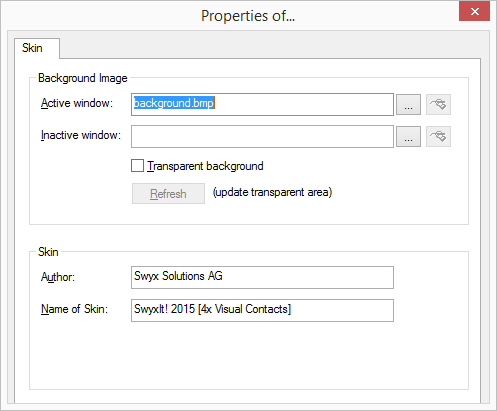
The "Properties of…" window will appear.
2 Define the graphic file you would like to use for the SwyxIt! background in the field “Active window”:

Click on

to search for the appropriate files.
Or
Click on

to edit the selected graphic using the linked graphic application.
3 If you would like to define a second background image for the inactive state, enter the appropriate graphic file in the field “Inactive window”. If you do not wish to have a second background image, just leave this field empty.
| Please remember that the graphics for both background images should be the same size. |
4 Enable the option “Transparent background” in order to display the SwyxIt! interface without window frames and menu bar.
If you use this option and the graphic format does not support transparency (BMP, JPG), the color of the upper left pixel of the graphic will be interpreted as a transparent color. This means that all sections of the background image which are displayed in this color will be transparent.
If the graphic format supports alpha channel transparency, the transparency information of the relevant pixel will be applied.
5 Click on ”Refresh” in order to re-integrate the graphic.
It makes sense to do this if you use a drawing program to change the background graphic while you are editing the current Skin.
6 Enter your name in the “Author” field.
7 Enter the name of the Skin in the “Name of Skin” field.
8 Click on exit, to close the window.