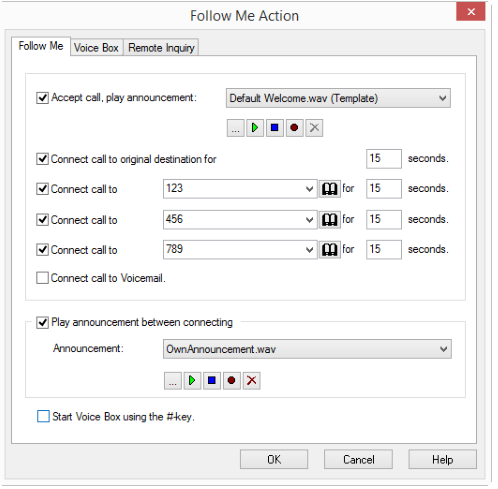
The FollowMe action attempts to reach the called subscriber (you) at different telephone numbers:
1 To pick up the call immediately,

activate “Accept call, play announcement” and
define the file for the announcement.
You have several options:
From the dropdown list select a file.
Browse your hard drive by clicking on

.
Click on

, to listen to the selected file. Click on

to stop playing the file.
To record a new announcement, click on

: You will now be prompted to enter a file name. The “Start Recording” window will appear. Click on “Start” to begin recording the announcement. Stop recording by clicking on
.
To delete the selected file, click on

.
| The WAV files, which the administrator has made available to all users, have the extension “(Template)” in the file name. These templates cannot be deleted. |
2 In order to have the call signaled at your desk for a specific period of time (your telephone “rings”),
activate “Connect call to original destination for” and
enter how long the call should be signaled until it is redirected.
3 To redirect the call (1st redirection),
activate “Connect call to” and
define where the call should redirected (it is possible to indicate a telephone number or a symbolic name if it has been entered in the Phonebook. The telephone number can also be selected from the Phonebook.) and
enter the period of time after which the redirection attempt will be cancelled if it was not successful.
Additional external numbers can be entered for use with "Parallel Call Signaling". This makes it possible to signal the connected call parallelly on all terminal devices referenced by the entered numbers. The call is made on the device which is first to pick up the call.
For detailed information on the use of the Phonebook see the SwyxIt! documentation.
4 In case the 1st redirection attempt was not successful, you can set the 2nd redirection (the same as 1st redirection).
5 In case the 2nd redirection attempt was not successful, you can set the 3rd redirection (the same as 1st redirection).
6 In case no forwarding attempt was successful, you can activate "Transfer call to Voice Box" to connect the caller to Voice Box.
7 Open the"Voice Box" tab.
8 Specify whether you want to use your normal Standard Voice Box or whether you want to define a special Voice Box (e.g. with a different announcement) for this action.
If you want to use the standard Voice Box, activate this option. You can still change the standard Voice Box here. To do so, click on "Configure…".
9 To define the text of the welcome announcement, activate “Welcome announcement”.
You have several options:
From the dropdown list select a file.
Browse your hard drive by clicking on
.
Click on
, to listen to the selected file. Click on
to stop playing the file.
To record a new announcement, click on
: You will now be prompted to enter a file name. The “Start Recording” window will appear. Click on “Start” to begin recording the announcement. Stop recording by clicking on
.
To delete the selected file, click on
.
| The WAV files, which the administrator has made available to all users, have the extension “(Template)” in the file name. These templates cannot be deleted. |
10 Activate “Use DTMF as Caller ID” in order to ask for the caller’s number if the number was not transmitted. In this case, the caller can transmit his number (Caller ID) using DTMF tones.
You can define the announcement as you did for the “Welcome Announcement”.
11 Activate “Announcement” in order to set other announcements (this only makes sense if you have already asked for the caller ID in the previous step).
You can define the announcement as you did for the “Welcome Announcement”.
12 Enter how long the caller’s message should be recorded in the field “Maximum message length … seconds” (Timeout).
13 In the "Send e-mail to" field, specify to whom the voice message should be sent.
14 Switch on "Start remote inquiry using * key during Voice Box announcement" to listen to your voice messages from another connection or to be able to change your instant forwarding remotely.
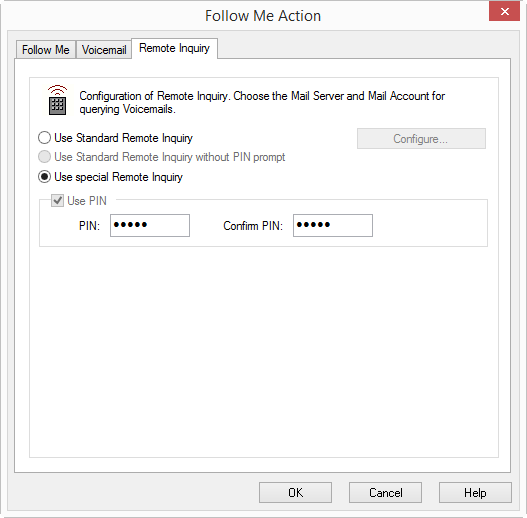
15 Move to tab "Remote Inquiry".
16 Define whether you would like to use your normal Standard Remote Inquiry (with or without PIN) or whether you would like to use a special Remote Inquiry for this action (e.g. with a different PIN):
If you would like to use the Standard Remote Inquiry, activate this option. It is still possible to change the Standard Remote Inquiry here. To do so, click on "Configure…".
The "Standard Remote Inquiry" tab will open.
If you would like to configure a special Remote Inquiry, which is only valid for this action, activate the option "Use special Remote Inquiry".
17 Define the PIN (Personal Identification Number) to be used for identification and confirm this here.
18 Click on "OK" to close the window.
You then return to the window “Action: FollwoMe".
For information on using the Voice Box see
Voice Box.
You will find detailed information on the use of Remote Inquiry in
Remote Inquiry.
19 Activate “Play announcement while connecting”, in order to play an appropriate announcement before each redirection attempt.
You can define the announcement as you did for the “Welcome Announcement”.
Activate "Start Voice Box using # key" to allow the caller to immediately leave a message in the voice box of the desired subscriber by pressing the hash key.
20 Click on “OK”.