Any number of groups with any number of members can be configured in a SwyxWare installation; a user can be a member of more than one group. Setting up groups makes it possible to contact members at a central group number.
1 Click with the right mouse button on "Groups" and select "Add Group…".
The "Add new group..." Wizard will appear.
2 Group Properties
Enter a name and, if required, a description for the group. The name must be unambiguous within SwyxWare.
Indicate whether from now on all newly created users should be members of this group.
| The Checkbox "Make this group the 'Everyone Group'. All new users will be added to this group." can only be activated if you have previously deactivated this functionality in the "Everyone" group. However, new users will then no longer have access to the functionality of the pre-configured group "Everyone", e. g. Standard Call Handling. |
Click on "Next>".
3 Hunt group type:
Specify how calls are to be delivered to the individual members. You have several options:

Parallel
Calls to the group number are delivered simultaneously to all members. The person who accepts the call first speaks to the caller.
Sequential
Calls to the group are delivered to each group member in order, always starting with the first group member.
Rotary
Calls to the group are delivered to each group member in order, Always starting with the next group member, i. e. for the second call with the second member, for the third call with the third member and so on.
Specify the maximum duration of an individual connection attempt, before the call is routed to the next member of the group.
Random
Calls are distributed randomly within the group, i. e. when the specified time is over, the next member is selected randomly from the entire group.
Specify the maximum duration of an individual connection attempt, before the call is routed to the next member of the group.
Click on "Next>".
4 Internal number
Assign the group an internal group number. All members of the group can be reached at this number.
Use "Verify" to immediately check whether this number has already been assigned.
Clicking on "Next unused" will automatically assign the next unused internal number to the user. You can also enter a number, e. g. 210, in order to leave the number range below untouched. Clicking on "Next unused" will then assign the next unused internal number. "Check" lets you check whether an entered internal number is already present.
Activate the checkbox "Show in Phonebook" if this number is to be listed in the Global Phonebook. Name resolution is always performed, regardless of whether the user is entered in the Global Phonebook.
Click on "Next>".
5 Internal number mapping:
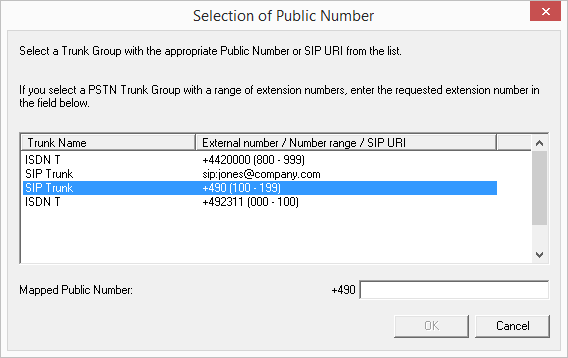
If the internal number is to be reachable from the public telephone network, it must be mapped to an external number. You can enter this public number directly in the field or click "Select...".
The "Choose public number" window will appear.
Select the SIP URI or public number here.
Assign the external number in the "Mapped Public Number:" field and click "OK".
Click on "Next>".
6 Group members
Add the users who are to be members of this group. Click "Add..." to select SwyxWare users from a list.
You can select and add several users at the same time by keeping the Ctrl button pressed.
With the sequential and rotary call Hunt Group types the order of group members is observed. Use the arrows to sort the group members so that the first member is at the top of the list.
| You can also add users later by selecting the users in the user list and moving them into the group per Drag&Drop. |
7 End the set up of the group by clicking on "Finish".
The users assigned to a group will be shown when you highlight the desired group in the "Groups" directory. The members will then be listed in the window on the right.
1 Click with the right mouse button on the group in which you would like to add or remove the user and then select "Properties".
2 Select the "Members" tab.
3 Click on "Add".
4 Select the desired users in the dialog which now appears. If you would like to remove a user from a group, highlight this user and click "Remove".
Or
1 Select the user list.
2 Highlight all the users that you would like to add to or remove from the group. Hold down the CTRL key to select multiple users.
3 Move all users into the group by drag&drop.
Users newly added to the group are always inserted at the end of the group. Use the arrow keys on the right-hand side of the list to change the position of a new user within the group.