Startup of SwyxConnect 5000/8000
1 Connect SwyxConnect to the LAN. Ethernet connections are redundant and can be found on the front panel.
2 Connect SwyxConnect to the power supply. It will start, and after a little while it can be reached on the preset address IP 192.168.0.2 (subnet mask 255.255.225.0, gateway 192.168.0.1).
3 Start a web browser, deactivate the proxy settings and then enter "http://192.168.0.2.", to establish a link to SwyxConnect.
4 For the user name and password, enter "Admin" (factory setting). Entries are case-sensitive.
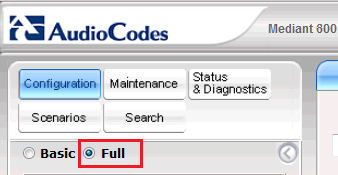
5 After log-on, set the view of the tree structure to "Full" so that all entries become visible (recommended after every login).
You can also find an entry in the tree structure using Search. Click on "Search", and enter all or part of the entry name.
6 Upload the new firmware and the file for the CallProgress tones to be used.
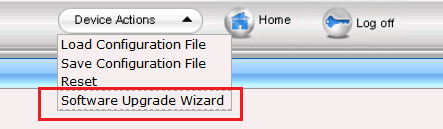
7 Start the update of the firmware by calling up the parent menu "Device Actions | Software Upgrade Wizard".
The wizard takes you through the individual steps to update the firmware.
Confirm the following dialogs and wait for SwyxConnect to restart.
Fig. C-5: Device Actions
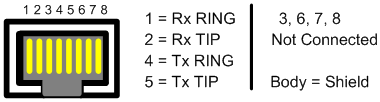
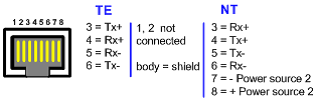
8 Finally the connection to the PSTN and/or to any ISDN or analog telephones has to be set up. Connect SwyxConnect to your NTBA and the terminal devices. The figures below show the pin configuration of the PRI and BRI modules of SwyxConnect.
Fig. C-6: RJ-48c Pin configuration of an E1/T1 PRI plug-in module
Fig. C-7: RJ-45 Pin configuration of a BRI plug-in module
Last modified date: 01/24/2024